We release a new version every four weeks on Monday. This lines up with our sprints, which are two weeks. Code freeze and "break the release" happens on Wednesday before.
Because there are thirteen weeks in a quarter, there is always one extra out-of-sprint week at the end of each quarter. We dedicate that last week to cleanup tasks along with OKR reflection and planning.
This consistency is important, as it means our community and our customers can look forward to new features at a predictable pace. There will always be more work that we want to do and if we get in a habit of pushing deadlines out, we'll push them further and further.
Each release there is a different release owner in charge, according to this calendar.
If we've shipped features that we want to feature in the release notes, we use the label highlight on our pull request. If after the code freeze we have important bugfixes that we want to get into the release, we add the label release-[version]. This makes it easier for the release owner to figure out changes for the release blog post and to cherry-pick commits between the Code Freeze and the Release.
When we say "release", technically we mean releasing to self-hosted users as we deploy PostHog Cloud continuously. However, releases are still an important moment within PostHog as we publicly announce all new features.
Version numbers
Every release we bump the minor in major.minor.patch. At the moment, we're at version 1 for major. This will only change once we have released sufficient functionality under stage 2 of our Roadmap.
Hopefully we will not have to do many patch versions, but if between versions we discover a breaking bug, we will.
Timeline
💡 For the context of this guide
[version]is interpreted as the version of the release (e.g.1.29.0).
On the Wednesday before the release, we institute a code freeze. Feel free to make an announcement on Slack before we cut the branch, so people have a heads-up. Then, we branch master into release-[version] and deploy that to our playground environment, playground.posthog.com. We then host an hour-long "Break the release" session where everyone lends a hand in testing for any bugs. It's a recurring meeting, so you don't need to set it up.
Only bugfixes and finishing touches are allowed to be merged into this branch between the code freeze and the release going out. This gives us about three days to test the release.
The release manager is ultimately responsible for the timeline of the release. They are responsible for creating the "Code freeze" and "Break the release" calendar events as soon as possible. They should create these events under the Releases calendar linked up top.
Steps
Pre-release (Wednesday before the release)
If you have a PR which you want to be included in marketing announcements, which requires user action, or is otherwise notable, add the highlight tag to the PR.
- Post in #dev about the upcoming release (replace
<version>and<array draft pr>from Joe)
Start the
release-[version]branch frommasterto initiate the code freeze.Update the
VERSIONvalue inposthog/version.pyand add an appropriate entry inposthog/versions.json. Then commit those changes:Terminalgit checkout release-[version]git add posthog/version.py versions.jsongit commit -m "chore: Bump version to [version]"Publish the
release-[version]branch:Terminalgit push -u origin release-[version]Note that this will result in a Docker image tagged
release-[version]-unstablebeing built. It might take a while, but it should show up in Docker Hub within half an hour. You can check the build's status on the GitHub Actions page of the main repo.💡 Make sure you have
doctl,helm, andk9sinstalled before going through the next steps. You can install all of these withbrew install doctl helm k9s.Create a new
charts-clickhousebranch namedbump-[version]to update the Helm chart:- In
Chart.yamlupdateappVersionto the new version. - In
Chart.yamlupdateversion.
- If you're releasing a patch version of the app, increase the
patchversion by 1. - If you're releasing a minor version of the app with no breaking changes, increase the
minorversion by 1. - If you're releasing a minor version of the app with breaking changes for deployment (e.g. you must run async migrations manually), increase the
majorversion by 1 and publish upgrade notes for the chart.
- In values.yaml update
image.defaultto point to the new unstable tag (i.e.:release-[version]-unstable). - In
ALL_VALUES.mdupdate the default value ofimage.defaultto what you set in the previous step. Also, update theAppVersionshields.io badge at the top. - Push the relevant changes and create a PR. Do not merge this PR. (You can see that in Docker Hub)
- Make sure all tests pass in this PR. If a test fails, to get the errors, check the "namespace report", which is run right after the failed test.
- In
Upgrade PostHog playground
The PostHog Playground uses a helm chart deployment on DigitalOcean. Find the playground cluster in our DigitalOcean Kubernetes clusters list.
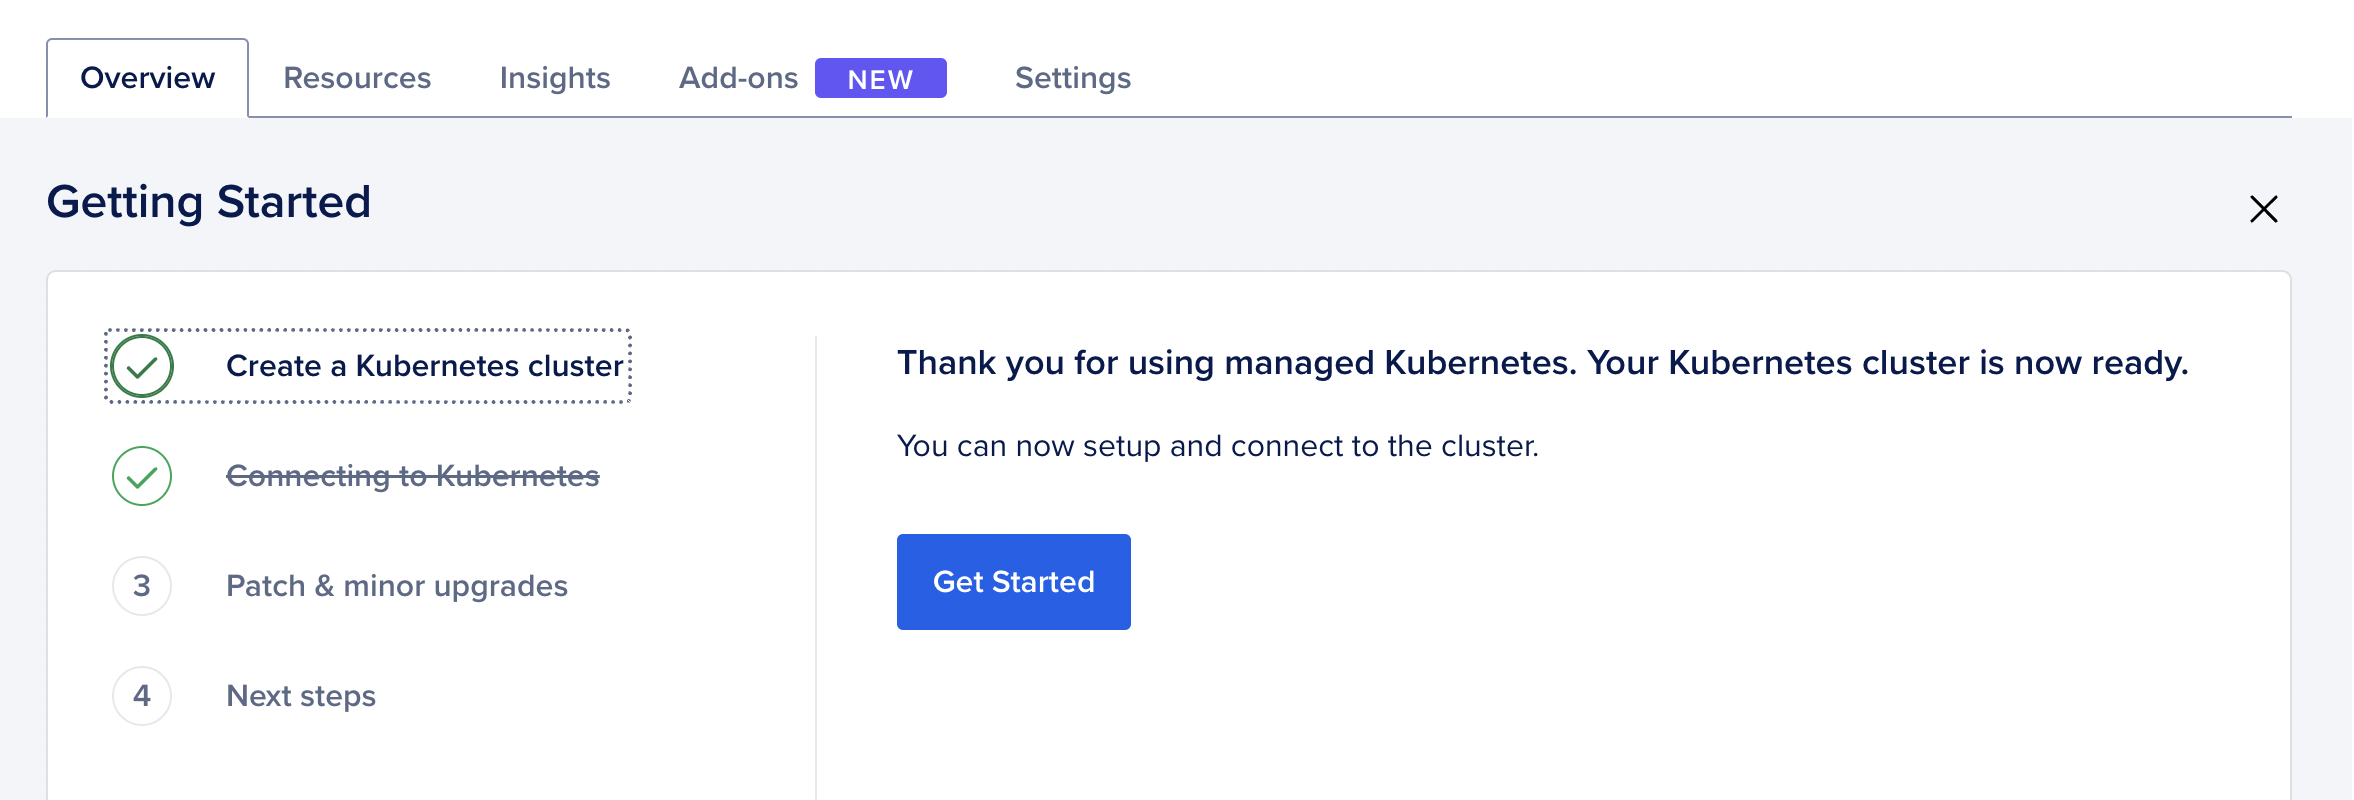
If this is your first time on DigitalOcean, you'll see the below screen. If it's not, or you don't see the Getting Started flow, click "Remind me how to use this file to connect to the cluster" in the "Config file" section under the "Overview" tab. Click Get Started.

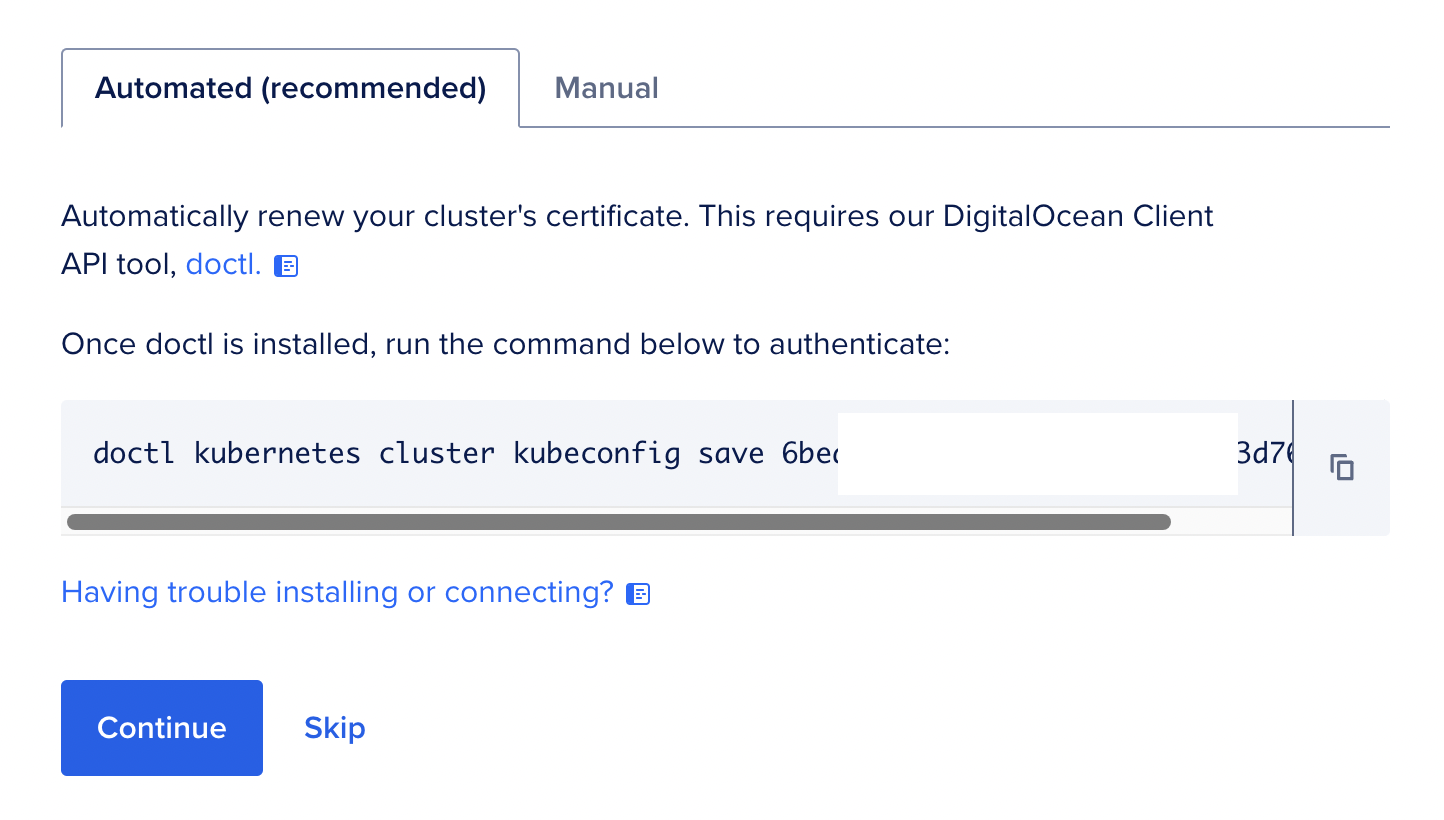
Copy the automatic connection script by clicking the copy icon.

Open terminal and run the command you copied. This command will set the correct kubectl context for the playground environment. As a sanity check, run
kubectl config current-contextand make sure that the current context name hasplaygroundin it somewhere.Optional: Open another terminal window and run
k9s. Use the arrow keys to scroll down to the PostHog clusters and keep an eye on this for the duration of the upgrade.k9sis a terminal GUI that makes it easier to manage and observe your deployed Kubernetes applications.Get the latest values and store them in a
playground.yamlfile:Terminal# use tail to remove the first line "USER SUPPLIED VALUES:"helm get values posthog -n posthog | tail -n +2 > playground.yamlUpdate the
playground.yamlforimage: -> tag:value torelease-[version]-unstablewith the new version.Follow the upgrade instructions here. Replace
values.yamlin the last upgrade command withplayground.yaml.⚠️ Note that you might need to follow major upgrade notes as mentioned in the upgrade guide, the same way our users would be required to. If so, make any additional changes to the
playground.yamlfile as needed. ⚠️ Make sure you're not in a working directory containingposthogfolder, this could lead to the upgrade command looking for the chart locally rather than using the helm repo installed and seeing an error likeChart.yaml not found.Optional: Keep an eye on the progress of the upgrade in
k9sIf the
helm upgradecommand fails or if in the end the output forkubectl get pods -n posthogdoesn't show everything as running, then askteam-platformfor guidance.Optional: Verify playground is running the latest image by running
kubectl get pod --namespace posthog. In the output of that command, you should see a row likeposthog-web-6447ff5fdf-gs664. Copy this row (the numbers afterposthog-web-will be different), and then runkubectl describe pod --namespace posthog posthog-web-6447ff5fdf-gs664. If you scroll up in that output, you should see a line likeImage: posthog/posthog@sha256:daf43a4a4cd06658e41273bb8fe4a74f17b295d67c6f1e16c17243b5d09af7ee. This is the sha of the image that is running. You can compare this to the sha in Docker Hub to verify that the image is the latest.Go to the playground and test that everything is working as expected. Check that the version running is the same as the one we're releasing.
Commit the changes to the
playground.yamlfile in thevpcrepo - have someone from Infrastructure team review.
Time for the "Break the release" session! It's imperative that the session uses the published
release-[version]-unstableimage from Docker Hub to avoid any potential bugs creeping up in the final build stage. You're responsible for running the session, prepare the release checklist doc by adding the template at the top. Note that you're also responsible for making sure everything is tested and for cherry picking the fixes and prs tagged withrelease-<version>into the release branch.Figure out what's updated in this release with the command below or by asking the Product or Engineering Team. The command will output the entire commit list to
changelog.txt, sorted by PR type and scope. You can use this list to obtain external contributions to highlight in the Array. In addition, you can look for thehighlighttag in PRs but be mindful it's not used very consistently.Terminalgit checkout release-[version]git log --pretty=format:"%s %ae" origin/release-[old-version]..head | sort -t ':' -k 1,1 -s > changelog.txtIf you haven't already done so, either add the highlight tag to any notable PRs, or otherwise inform marketing (usually Joe) about them.
Launch (day of the release)
- Tag the version in GitHub. This will also build and push the
release-[version],latest-release(for both PostHog base & FOSS) Docker images to Docker Hub. Please do this once the release branch is finalized, some users may see the image on Docker Hub and update immediately.Terminalgit tag -a [version] -m "Version [version]"git push --follow-tags - Update the PR in charts-clickhouse and change the image from
release-1.x.y-unstabletorelease-1.x.y. - Create a new main repo (
posthog) branch namedsync-[version]. Cherry-pick therelease-[version]commits updatingversion.pyandversions.jsonintosync-[version]and create a PR to get them intomaster. Merging this to master will notify users that an update is available. The Array post should be out at this point so that the "Release notes" link isn't a 404. - Go to the EWXT9O7BVDC2O CloudFront distribution to the "Invalidations" tab and add a new one with
/*value. This will refresh the CloudFront cache so that users can see the new version. You can check this by visiting https://update.posthog.com/ - Inform the marketing team that a new release is available.
After release
- 48-72 hours after the release, disable the site banner. Marketing will arrange this.